About Me

I am a 15 year old guy who is drawn to knives and other pointy objects. In this blog, I hope to cover basics of knife ownership and eventually DIY knives. Nothing is for sale (yet) as I haven't made anything yet...

Saturday, December 10, 2011

It's been a long time coming as the forge date was about two weeks ago, but here is the short sword I made on the 26th of November. I'm going to have to bring it to a friend-who-has-a-forge's house because I don't yet have a functional forge. The reason for taking it back is to make the tang longer, and elongating the blade a little more. I hope to make this thing really awesome just to say, "Yeah I made that!"
About 2 feet long total...

Friday, November 25, 2011

Forge Day

Tomorrow is my last forge day of the season with New England Blacksmiths. I hope to finish my Machete sword thingy I'm making and start on some armor. My goal is to make pauldrons, greaves, shin guards, and bracers. I'll post images of my work. The machete will need to be sent somewhere to be heat treated though.

Tuesday, November 1, 2011

Knife

I made a legitimate knife at the forge the other day. It's actually quite awesome. Its a classic railroad spike knife. I still need to polish it up some more and finish the sharpening job... I like the look of the pockmarks from rust... It looks worn. The knife is too soft to hold a decent edge, but it looks cool.


Tuesday, September 20, 2011

I'm Happy Now!

I am going to a mini Blacksmithing open forge seminar thing on saturday. It's $10 and I can use their tools, metal, forge, anvil etc. I might be able to find/ make an anvil for myself then too. It should be pretty super-fly...

Tuesday, August 30, 2011

Gas Forge

Well, I've decided to remake my forge into a gas forge. I will be making 2 of these burners, and I will have to find some firebrick. The reason for me using firebrick instead of the granite I already have is that the granite has a very real chance of exploding, and the firebrick insulates better. I have no idea where to find firebrick though. I'll try Home Depot, Lowe's, some pottery stores, and our basement. The challenge after that will be getting steel. I will probably try steel rebar from Home Depot/Lowe's and the scrapyard at the dump. Of course I will also need an anvil. Again scrapyard at the dump may have something I could use as a substitute.

Peace out
-Tristan

Friday, August 12, 2011

Knife

So I just got home from scout camp where knives are your life. Basically, my friend found a Gerber 06 Automatic knife on a stump. It is a $124 knife. Yes, we kept it.

Friday, August 5, 2011

My Forge

So this is my forge. A pile of rocks on top of another larger rock. It serves its purpose though. The inside is about a foot deep and 9 inches wide. The pole you see sticking into it from the left side is for air, and the rod is attached to a pump.


I do not yet have an anvil, so I had to find an anvil shaped object, and this rock seemed to do the trick. It is stable and heavy with a flat top which is just what I was looking for.


Starting the forge with the nail I was trying to melt in the bottom middle. We (my brother and me) went through a lot of wood trying to keep the embers nice and hot.


Later on in the operation of the forge we got some nice embers (which don't show up in this)  and the nail is still there.


At the end of the day, after 4 hours of heating, we were unable to turn the nail glowing. We did get a dull red glow however, but that didn't last. Our main problem is the wrong wood. We were burning pine boards which burned quickly but with not too much heat. The forge was still very hot, we got hungry and made toast in less than 5 minutes a few inches away from the mouth of the furnace. There is a lot i need to learn about using a forge correctly, but I know it will work eventually. When we decided to kill the fire, I got some water on the rocks making up the forge, and the water instantly boiled. Those rocks were hot... I plan to keep experimenting, and I will keep this blog updated.

Sunday, July 31, 2011

Restore Project

For my first post, I decided to tackle a simple restoration. This was my Great Grandfather's Boy Scout knife. The knife itself is beautiful with faux wood inserts of walnutty brown, with nice steel tools. However, the steel was rusty and the inserts were dull. I aimed to fix that...

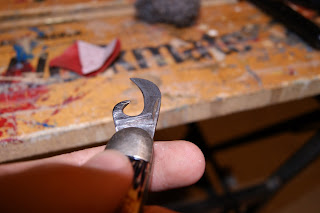
First is I decided to do the can opener. As you can see, there is a fair amount of rust and grime on it.

 After scrubbing furiously with steel wool and carefully rubbing it with sandpaper and a file, it looked like this:
 Then I moved on to the awl (leather punch). Again, rust and grime. I forgot to take an "after" picture...
 The blade... The most dangerous area to clean because of the hazard of the blade closing and slicing your finger open (I've done that). Also, there is a risk of sliding your finger over the sharp edge (done that too!) For this step I put some leather gloves on.

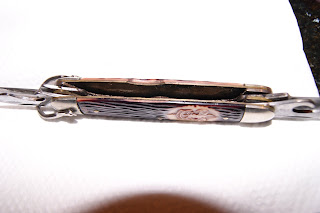
 Next, I opened up all the tools to see the inside full of grime and rust.

 To clean this up, I used a dry Q-tip to swab the inside and leave it fairly clean. I then put knife oil on a Q-tip and swabbed the inside again. This removed some rust and more grime. I then used another Q-tip to oil the outside of the knife and all the tools. Finally, I dripped oil inside the knife to clean in between the springs, and I also dripped oil on the hinges of the tools.
 Aftermath grime.
 Newly restored knife.
Quick side by side comparison and close ups of my two Scout knives. Old on the left, newer on the right.


 Another of my great grandfather's knives. This one is my brothers and is in no need of any restoration.